

Are you looking to add a touch of elegance and functionality to your living space? A stylish wooden bookshelf can do just that, and what’s even better is that you can create it yourself with the help of some essential tools homedepot. With a wide selection of tools available on homedepot, you can easily find everything you need to complete this DIY project. Whether you’re a beginner or an experienced DIY enthusiast, creating a stylish wooden bookshelf will not only enhance the aesthetic appeal of your space but also provide a practical storage solution for your books and decor items.
Now, we’ll guide you through the steps to construct a beautiful wooden bookshelf that not only enhances your home decor but also provides a practical storage solution. So, let’s get started!
Materials and Tools:
Before diving into the construction process, let’s gather the materials and tools you’ll need. For your convenience, we’ve provided suggestions for each item available on homedepot:
Materials:
- Wooden Boards: You can choose from various wood types, such as pine, oak, or birch. We recommend 1 in. x 12 in. x 8 ft. Premium Kiln-Dried Square Edge Whitewood Common Softwood Board for the shelves.
- Wood glue: for securely bonding the wood pieces. [Suggested product: Titebond Wood Glue]
- Finishing Nails: To reinforce the shelves and supports. [Suggested product: Grip Rite Prime Guard Nails]
- Wood stain or paint: Choose a finish that complements your decor. [Suggested product: Varathane Wood Stain]
- Clear Wood Finish (optional): For protection and shine. [Suggested product: Minwax Polycrylic Protective Finish]
Tools:
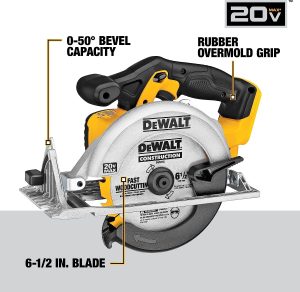
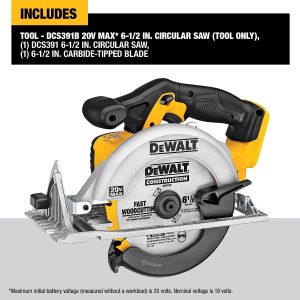
1. Saw: A saw is essential for cutting the wooden boards to the desired lengths. [Suggested product: DEWALT 20V Max Circular Saw]


Review Product
The DEWALT 20V MAX Circular Saw, DCS391B, is a versatile and powerful tool suitable for both professional and DIY users. Its portability, powerful motor, bevel capability, and ergonomic design are major advantages. However, the "bare tool" format, price, battery life, weight, and lack of an electric brake are potential drawbacks. Your decision should depend on your specific needs, budget, and whether you already own DEWALT 20V Max batteries and chargers.
2. Measuring Tape: Accurate measurements are crucial for a perfect fit. [Suggested product: 25 ft. PowerLock Tape Measure]

Review Product
Equip yourself with the tool longevity and reliability needed on the jobsite with this 25 ft. PowerLock Tape Measure. Get consistent precision when you work with this tape measure, which features a Tru-Zero end hook for professional-level accuracy and a protective Mylar-coated blade for long life. For best performance, the blade lock securely keeps the tape measure in place as you work.
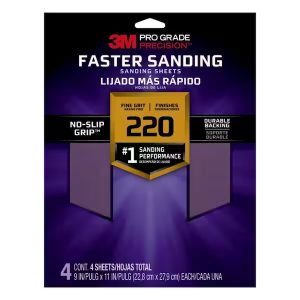
3. Sandpaper: Smooth down rough edges and surfaces with sandpaper, such as Pro Grade Precision 9 in. x 11 in. Fine 220-Grit Sheet Sandpaper.
Review Product
Sanding Performance. 3M Pro Grade Precision Faster Sanding Sheets with enhanced mineral technology resists clogging and sands faster. Fold once and the NO-SLIP GRIP durable backing grips together to prevent slipping so you can sand longer with less hand fatigue. Superior cut durability from start to finish. For when endurance matters.
4. Hammer: To drive in the finishing nails. [Suggested product: 5 oz. Tack Hammer with Wood Handle]

Review Product
The Husky 5 oz. Magnetic Tack Hammer is designed for driving tacks into wood and other material. It features a polished, magnetic face for holding and setting tacks and a smooth face for striking tacks. The head is forged from high quality steel and the handle is high-quality hardwood.
5. Paintbrush/Roller: For applying wood stain or paint. [Suggested product: Good 3 in. Flat Cut Polyester Paint Brush]
Step-by-Step Guide
- Measure and Cut: Measure the desired length for your shelves and cut the wooden boards accordingly using the circular saw. Ensure they are all the same size for a symmetrical look.
- Sand and Smooth: Use the sandpaper to smooth out any rough edges or surfaces on the wooden boards. This step is crucial for a professional finish.
- Assemble the Shelves: Apply wood glue to the edges of the shelves and attach them to the vertical supports. Reinforce with finishing nails for added stability.
- Stain or Paint: Apply the wood stain or paint of your choice to the bookshelf, following the manufacturer’s instructions. Allow it to dry thoroughly.
- Optional Finish: For extra protection and shine, apply a clear wood finish like polyurethane or polycrylic. This step is particularly important if the bookshelf will be exposed to moisture or heavy use.
- Let It Dry: Ensure your DIY bookshelf is completely dry before placing it in your desired location.
- Decorate and Organize: Now comes the fun part! Decorate your bookshelf with your favorite books, plants, or decorative items. This is your chance to showcase your personal style and creativity.
By following these simple steps and using the suggested materials and tools from homedepot, you can create a stylish wooden bookshelf that complements your home decor and offers a functional storage solution. Whether you’re a seasoned DIY enthusiast or a beginner, this project is a rewarding way to add a touch of elegance to your living space. Happy crafting!


